Illustrator
DRAWING WITH LIVE SYMMETRY IN ILLUSTRATOR
Drawing and editing symmetrical shapes in Illustrator is relatively straightforward when working with simple forms like ellipses and rectangles. However, things get more challenging as shapes become more complex. One option is to use the Reflect Tool but this means creating a reflected copy each time an edit is made and deleting the previously flipped version. Fortunately we can use the Transform function from the Effects menu to give us live symmetry that updates as we edit – oh happy day!
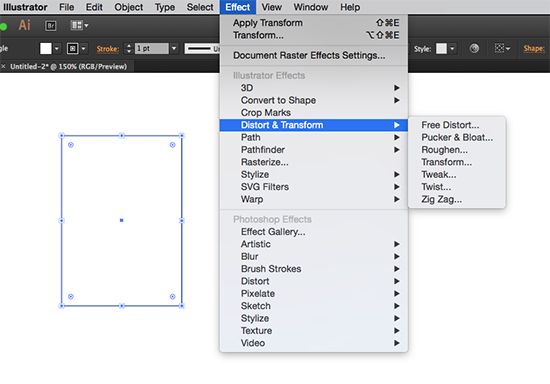
To start I’ll draw a rectangle and, with it still selected, go to Effect>Distort&Transform>Transform…

This brings up the control dialogue for the Transform effect. I want the left side of my rectangle to form the centre-line of my symmetrical shape so I need to set the Reference Point to centre left and Reflect on the X axis. Copies should be set to 1. If you check the Preview box you should see your rectangle mirrored on its left side – now click OK.

Now any edit you make to your shape is automatically mirrored giving you perfect symmetry.


You can even use Shapebuilder and Pathfinder functions to include other shapes – as long as the original shape remains the Transform effect will remain intact. Certain Pathfinder functions will technically create a ‘new’ shape so the Transform effect is removed – this is just a case of trial and error to find what works and what doesn’t.

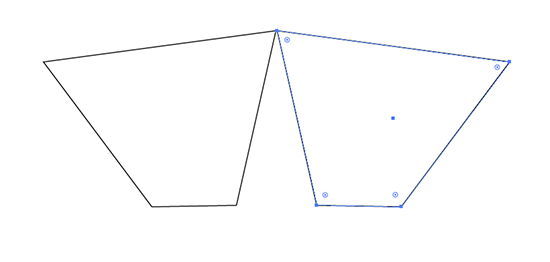
Bear in mind that, with our current settings, the symmetry is based off of the left-most point of our shape so things will begin to separate if the left-side is anything other than verticle. If this is the desired effect then no problem.

Because the Transform is applied as an effect we can go to the Appearance Panel at any time to edit, disable or remove the effect giving us complete control.

If you want to join both halves together to create a composite whole then go to Object>Expand Appearance. This will convert the mirrored half into an editable object which can then be joined with the original using pathfinder or shapebuilder functions. Perfect, easy-to-edit symmetry – done!